Dr. Strange VFX Recreation: Final Wrap-Up
The time has finally come, I’ve completed the final project of my senior year at the University of Texas at Dallas! It feels like just yesterday I started taking my first VFX class and opened Houdini for the first time-- time has certainly flown by in this year and a half since the beginning of my journey into the wonderful world of visual effects. Even in that short amount of time, I feel like I’ve learned so much but also simultaneously have so much left to learn, and this capstone project was definitely a prime reminder of both of those things.
I went into this semester wanting to create a capstone project that felt like a step up from my previous independent study VFX projects and I can say with certainty now that this shot from Dr. Strange in the Multiverse of Madness definitely fit that bill. This endeavor marked a lot of firsts for me--particularly in proceduralism and VEX coding--and though the process was a bit painful at first, it ended up being a really interesting and invaluable educational journey that pushed me far out of my comfort zone. So, without further ado, let’s delve right into the final breakdown for this Dr. Strange VFX shot recreation!
Cobblestone Setup
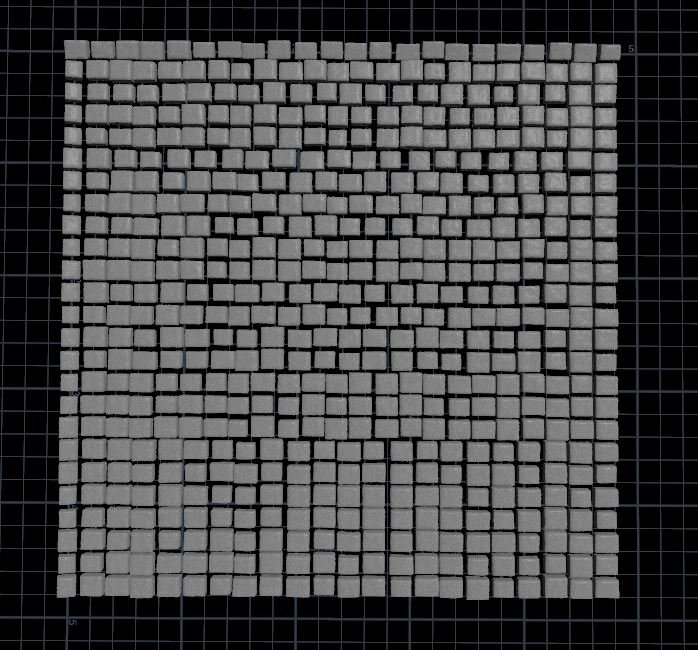
I would be remiss if I didn’t talk about the infamous cobblestones first, since they were both literally and figuratively the fundamental building blocks of this shot. I would say this element was the one that went through the most evolution throughout the duration of this project, with me making small improvements on it almost every week as I thought of new ways to improve and iterate on it.
First, I created 2 line geometries: 1 horizontal and 1 vertical. The horizontal line was then copied to the points created on the vertical line, giving me a basic grid of points outlining how the cobblestones would be arranged. Utilizing the line geometry allowed me to easily control the size of the overall grid, spacing between each stone, and how many stones there would be per row. I was also able to randomly vary the amount of stones per row within a set range by incorporating for loop and a simple line of VEX code.
After setting up the layout for the cobblestones with the lines and points, I created 4 unique individual cobblestones by deforming some small rectangular boxes. Then, I copied those boxes to the grid of points created by the intersecting lines, giving me my procedural cobblestone floor! To elevate the look of the cobblestones and eliminate unnatural-looking repeating stones, I also included some lookdev parameters within the cobblestone variations driven by a for loop that randomly varied the bevel strength and point jitter amount for each stone, ensuring that no two stones looked exactly alike.
I also ended up adding one last layer of control for the sake of both the overall look of the cobblestones as well as the optimization of the elements affected by the cobblestones. The objective of this endeavor was to eliminate any unnatural intersecting between stones, which I achieved by utilizing the intersection analysis node to single out overlapping stones and run them through one last for loop that would transform them each to be slightly smaller.
Lookdev-wise, I utilized triplanar texturing for the material of the cobblestones, giving them all a slightly varied version of a stone material I grabbed off of polyhaven. Additionally, I implemented a wet map onto the lower half of the cobblestones obscured by the dirt, utilizing the attribute to create a blend between a dirt material and the base stone material to create the illusion that part of the stone was covered in dirt.
Magic Stream
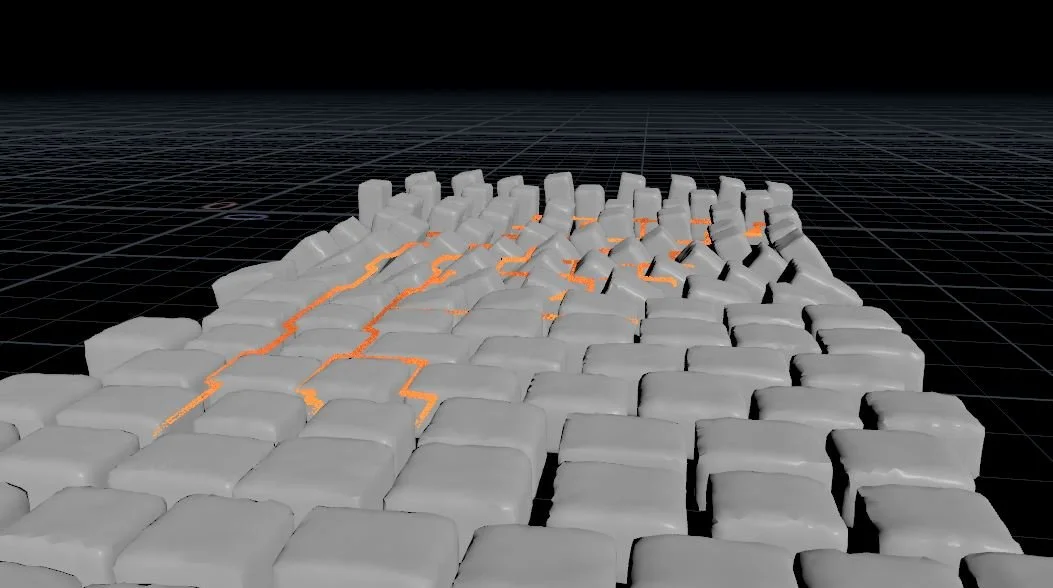
The second most essential element of this shot was of course the classic Dr. Strange orange magic stream that runs through the cobblestones and moves them aside. This element essentially relies on one main node to create the streams themselves: find shortest paths. This node takes a selection of start points and a selection of end points and creates curves finding the shortest path to travel between the two. The main downside to this node is that it is incredibly difficult to control exactly how the paths look and travel, since you’re restricted to only a handful of attributes that allow you to art direct the path. Since I needed a quite specific spread of paths to make up the magic stream, I ended up creating about 7 individual sections of paths in order to cover all the areas that needed to be covered as well as animate all the different timings of the streams.
Each stream ran across a grid geometry that I utilized a boolean node to cut out the shapes of the cobblestones from. As I mentioned previously, I divided the magic streams into 7 sections based on location and how quickly the stream moved. For each stream section, I varied the start and end points, utilized the “avoid” attribute to ensure it would only run across a specific part of the grid, and utilized a noise on the “path cost” attribute to give me some control over how the streams themselves looked.
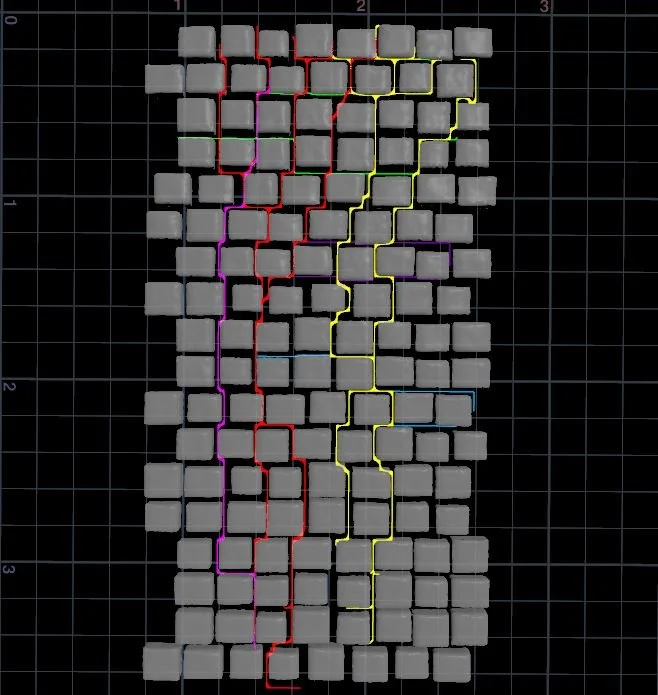
The movement of the streams was driven by an attribute vop that essentially performed a more detailed version of the carve node, allowing me to control over directing the timing of the stream growth, the size of the streams, and even adding some variation to which parts of the path grow when. After that, I was able to create the final look of the streams by scattering points on a polywire created from the base paths and utilizing another attribute vop to drive the color of the streams based on their overall length (as well as adding some noise to get some variation in color throughout the streams).
Cobblestones Movement + RBD
Going back to the cobblestones, once I created the magic stream, I was able to create the movement for the stones magically displaced by Dr. Strange’s magic beginning with a keyframe animation and switching to a RBD sim to drop the stones in the end. I started with a grouped selection of stones from the base grid, extracting the points from them to manipulate and animate. In order to drive the initial keyframe animation of the stones, I essentially took the individual points and moved them along a curve which I created similarly to how I would a lightning curve.
This movement was driven by 2 attributes inside of a solver node: a “mask” attribute transferred from a slightly delayed version of the magic stream that determined if and when the cobblestones should be set as active and begin moving, and a “stream” attribute whose value would be added to each frame and determine how quickly the stones would move across the curve. The “stream” attribute was then plugged into a carve node, giving me the initial animation of the cobblestones across the curve. I also utilized a similar method to drive the rotation of the cobblestones, allowing them to each rotate 360 degrees once they began moving across the curve. I was also able to add an additional layer of control to the attribute wrangles driving these attributes, utilizing a ramp to replicate the slow to fast movement of the cobblestones in my reference shot.
As for the RBD, I would say my setup was pretty basic and simplified by the fact that I wasn’t doing any actual fracturing of the geometry. I did end up creating a dop net and setting up the RBD manually as opposed to using the rbd bullet solver shelf tool, since the node in sops was giving me all sorts of weird issues. The attributes I set up previously to drive the keyframe movement ended up being quite helpful in driving the rbd, allowing me to use some simple attribute wrangles to manipulate the “active” and “deforming” RBD attributes and determine when the stones would switch over to the RBD sim. What ended up working best was setting the RBD to activate once the cobblestones had rotated about 320 degrees, where they would then be dropped onto the ground and collide with each other.

Magic Sparks
The final magic element to this shot that integrated the magic stream and the cobblestones more cohesively was the magic sparks particle sim. These particles were emitted from a thickened version of the magic stream with points scattered across it, which I applied an additional density mask attribute to in order to ensure more particles were emitted from the front of the streams than the back.
There are essentially 2 separate groups of particles that make up the sparks divided by lifespan. The first group of particles were the ones that shot up densely from the streams and died off very quickly. The second group of particles were the ones that lingered and floated around for much longer, also being affected by the wind created by the movement of the cobblestones. In order to achieve this effect, I utilized an advect by volume node inside the pop net that utilized a simple pyro smoke sim driven by the velocity of the cobblestones.
I approached the lookdev of these particles quite similarly to how I did the sparks from The Nevers project, “cheating” the velocity blur by replicating the particles and adding a curve between them as well as adding some attribute vops and attribute adjust nodes for width, color, and brightness variation based on lifespan.

Falling Dirt
The falling dirt revealed below the displaced cobblestones was relatively straightforward to approach, utilizing a vellum grain sim to create realistic interacting weighted particles. The main challenge to the dirt was getting natural-looking chunks of dirt that would stick together but still fall in a realistic way. The point cluster node was the key player in getting those dirt chunks, though the node itself does not create very pretty looking chunks on its own. However, creating my own “cluster” attribute with a noise pattern applied to it and utilizing that to drive the point cluster node fixed that problem and allowed me to control how the dirt would cluster together. I also ended up applying a more detailed smaller noise to the outer perimeter of the dirt to create a sort of gradient starting in the center of the dirt and making the chunks smaller as they got closer to the edge.
The last aspect I had to set up for the dirt was inside the actual vellum sim to determine which parts of the dirt would fall when, since I needed it to not fall all at once like a huge sheet. I actually used a setup very similar to how I moved the cobblestones, setting up a sop solver inside of the dop net and utilizing an attribute transfer from a box geometry on top of the dirt grains. I animated this box geometry to grow in size, gradually transferring all the grains it encompassed and activating the vellum sim dynamics for each of them.
Post-sim I added some variation to the pscale of the grains as well as their shade to add some color variation once I applied a material to the dirt. I also created a separate static vellum grain geometry to act as the dirt pit surrounding the falling dirt, which was just an extruded box with the top blasted off of it and some noise applied to the surface to make it look more natural.

Debris
One of the last small elements to include was the debris, the small dirt pieces/cobblestone bits that fall from the cobblestones once they’re lifted up. I played around with the idea of utilizing another RBD sim or vellum grains for the debris, but with how small and simple they were, a particle sim ended up being the best and simplest way to implement them. I sourced the particle sim from some points scattered on the lower half of the cobblestones the wet map covered, adding an attribute wrangle to blast out some points so the particles were only sourced from points moving at a certain speed threshold--something I actually stole from the debris source shelf tool node. The node itself wasn’t that helpful for me to utilize, but I did like the specific control it provided in allowing me to select points based on a speed threshold, so I delved into the node and replicated the nodes that were driving that aspect of it.
From there, I ran a simple particle sim to generate points that would fall from the cobblestones and collide with the ground, which I then utilized for a copy to points node to instance variations of the debris piece I created from a voronoi fracture. I varied both the pscale and the rotation of the debris pieces to ensure they didn’t all look exactly the same, adjusting the collisions of the particles to eliminate any weird intersections afterwards.

Dust Smoke
The final subtle finishing touch element for this shot was the dust smoke revealed and kicked up from the dirt under the cobblestones. This pyro sim was a walk in the park compared to the crazy pyro I worked with last semester, with the biggest challenge being ensuring the cobblestones would act as a proper collider with the smoke (inflating the VDB geometry for the collider seemed to do the trick in fixing collision issues). For this sim, I emitted the smoke from the lower section of the cobblestones and pretty much only used density and velocity as the driving attributes. I kept the pyro solver setup pretty minimal as well, since I didn’t want to add too many extra forces to the mix to get the most realistic movement for the smoke.

Compositing
This semester I spent significantly less time compositing things in Nuke, something that I’ll admit I did miss doing after my deep dive last semester. The magic was pretty much the only element I added extra effects to, something I would say I’m pretty well-versed in with my repertoire of magic-related VFX projects. However, it was still a bit daunting trying to mimic such the look of such an iconic magic like Dr. Strange’s, so I did spend some time refreshing my knowledge and looking into new tutorials to improve my magic-compositing skills. This shot also required some more color-grading and overall adjustments to tie the entire virtual environment together, something that I got some practice doing with the group project I contributed to last semester, but that I was still a bit rusty on at first.
Final Shot
After a rollercoaster of a semester and lots of new knowledge under my belt, I finally made it out with this final shot!
If I’ve learned anything from my time learning Houdini VFX and working on recreating professional shots, it’s that you can never judge a book by its cover when it comes to shot complexity. Even though I knew I wanted to step things up and do a larger-scope project for my senior capstone, I definitely did not quite realize the complexities this shot held and how many new things I would need to learn. This shot encapsulated many firsts for me, the biggest one being that this was my first time working on a shot with a good handful of elements all interacting with one another. That factor alone gave me a fair amount of trouble in the beginning, and even though I have historically been a fairly organized individual within my hip files, it taught me the hard way that consistently maintaining an extremely clean and well-organized file is essential in optimizing your workflow and saving yourself a lot of future pain.
Despite the many setbacks, mistakes, struggles, and overall ups and downs of this journey, I am graduating this semester incredibly grateful for the knowledge and experience I’ve been able to gain regarding VFX during my journey through college. I truly wish I was able to discover this passion sooner, but I certainly did my best to make the most of my time once I realized creating visual effects was something I wanted to pursue.
However, none of this would have been possible without the guidance and support of my amazing Professor, Nelson Lim. I will forever be thankful that Nelson decided to take a chance on me and continue working with me after I took his visual effects course, especially since my initial work was… very rough, to say the least. My time working with him through these various independent studies and projects has been invaluable and has taught me so much about what it means to be a great VFX artist. I am incredibly lucky to have been able to work with someone with such extensive industry knowledge and experience, always willing to sit down with me and work through any obscure problems I would come across. Throughout the highs and the lows, the rough critique sessions to the exciting problem-solving discoveries, I couldn’t have asked for a better mentor to guide me along this journey. From the bottom of my heart, thank you so much Nelson for everything that you’ve done for me and the passion you helped me to discover.
My additional heartfelt thank you’s go out to my fellow classmates who have suffered through this journey with me, Vy Lam, Zarah Najmi, and Mubashir Ali. We have all leaned on each other a lot throughout this process exploring visual effects within Houdini, and I definitely would not be here without the help and support of each of these amazing VFX artists. Each of them have also been working on a VFX shot recreation this semester, so be sure to check out their websites as well and look at their amazing projects once they post them!
Finally, whether you have been following my journey since the beginning with my Scarlet Witch magic recreation or you’ve just discovered me today and made it to the end of this lengthy blog post, I want to thank you as well for reading this and supporting my journey as a VFX artist! I hope to continue to work on exciting new projects and expand my portfolio now that I have graduated, so if you have enjoyed what you’ve seen so far I would appreciate any continued support in the future.
I am also currently actively seeking a job as a newly graduated VFX artist, so if my work has caught your eye please feel free to reach out to me on LinkedIn, through the contact page here on my website, or straight through my email at sydneymarie.smith02@gmail.com.