The Nevers Fire VFX Recreation: Troubleshooting Central
Try pyro simulations, they said, it won’t be that hard, they said!
I have had… quite the interesting time so far delving into pyro simulations in Houdini. Lots of troubleshooting, Houdini crashes, and tutorials watched in this past week of work. I will say though, my suffering was not for nothing, I have made it out of this week with a glimpse of hope still! So, let’s delve into the beginning of this journey, shall we?
To prepare for my first venture into pyro simulations, I went to YouTube and watched a bunch of tutorials on Houdini pyro simulations. The most helpful ones I’ve found so far were by Rebelway and Sadjad Rabiee on Youtube, definitely go check out their work! Armed with information and techniques from various tutorials, I went to work in Houdini to set up the pyro sim for the initial burst of flames in my reference.
I was very excited to begin my process with something very familiar to me: setting up a particle simulation! I first created a sphere to be the origin point and used a VEXpression to give it a velocity value to dictate where I wanted my fire to burst from and how far it should go. I also used a point velocity node to transform this velocity a little bit and get it to fan out to mimic the more spread out burst I wanted to achieve. I was then able to dive into a pop network and set up a pretty basic particle burst. After that, I utilized a trace and a resample node to add line segments based on the particle data and to add more detail to the overall sim. Finally, just before adding my pyro source node, I used a point VOP to create a way to add some noise to the curves created from my particle sims, with various fields to help me have better control over how I wanted the flames to burst out.
It should have been simple after that, right? Wrong. After plugging my deformed curves into a pyro source node and giving it some extra attributes like burn and temperature for the pyro sim, it was finally time to create a volume and simulate some flames. This is where disaster first struck. I first tried to use Houdini’s nifty new pyro sim nodes that allow you to simulate fire much faster by using your computer’s GPU as opposed to its CPU, but that’s where I ended up getting my first of many crashes of the program. For some reason, Houdini did not want to use my GPU and claimed I don’t have enough memory.
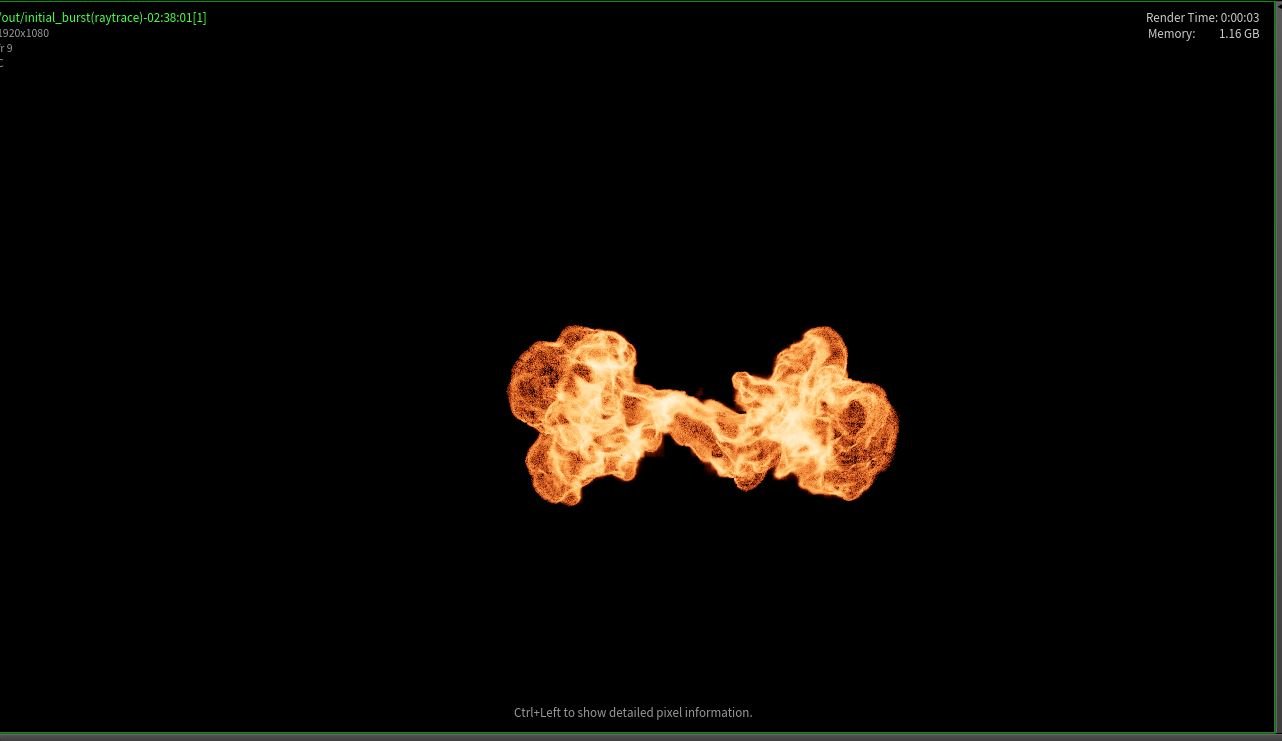
Regardless, I trudged on with a regular pyro solver node using the sparse simulation mode and was finally able to see some fire! Only problem was that it looked horrendous and very blocky, definitely not the kind of flames I wanted to get. With some advice from Nelson, I was able to discern that my voxel size and pscale were both the biggest issues I had and why I wasn’t getting any detail from my sim. So, I turned down my voxel size accordingly and--oh would you look at that, another Houdini crash. Turns out Houdini doesn’t love it when you turn your voxel size incredibly small, who knew? That being said, I do know that volumes are very heavy to simulate and that you should generally keep your voxel size bigger when making primary iterations of simulations. However, I needed to figure out what my actual voxel size needed to be first and if getting the amount of detail I wanted was even possible.

My horrendous first attempt at a pyro sim…
One thing I noticed when looking at the Houdini pyro tutorials was that the scale was always pretty big that people were working with. I brought this up with Nelson during one of our meetings and he told me that it is indeed something people do when making pyro sims, but that it’s definitely not essential considering my scale isn’t something outrageously small. He told me that I should only resort to changing the overall scale of the sim if I tried everything else and still had no success, and well…. I quickly reached this last resort.
I tried every solution I could think of, adjusting parameters, particle size, particle count, trying and failing to do a GPU pyro simulation, but nothing was working. So, as a hail mary of sorts, I duplicated my file and cranked up the scale a fair amount. My values being bigger overall really didn’t change that much about how I went about making the sim, but it did change the one thing that was really giving me grief: the voxel size. Now that my simulation was much bigger overall, I didn’t need to use such a tiny voxel size to get the right amount of detail. After going through the creation process again and adjusting values, I finally ended up with a working and mediocre looking pyro sim!
With this newfound motivation from this new success, I got into the real nitty gritty of messing with each field of the pyro sim to get the shape, movement, and coloring I wanted for my fire. I tried out a couple different methods for deforming my base geometry, some different nodes for actually producing the pyro sim, and also different ways to shade it within the pyro bake node-- it was very much a valuable learning experience that helped me familiarize myself with pyro sims and what fields control what in the simulation.
And speaking of the look of the fire and shading, I also tried out some new things when it came to making my pyro shader. First of all, if you are doing any kind of pyro sim in Houdini, PLEASE look into downloading the ACES color profile. It’s very easy to install and makes a huge difference in the way that your pyro sims look, literally just changing the color profile made my already existing preliminary pyro look 10 times better. Along with this, I’ve started to learn the appeals of the mantra render view! I noticed a lot of tutorials I was watching used mantra specifically for when they were making their pyro shader, so I figured I should give it a try for this project. I must say, I do quite enjoy its ease of use as opposed to the solaris workflow--however, I did still end up transferring it to solaris to render out this first image sequence of my sim.
That was apparently my second mistake. I had high hopes for transferring my pyro shader I created in the obj view into solaris, it seemed easy enough in the tutorials I watched and looked pretty true to how the render came out in mantra. Unfortunately for me, things didn’t go incredibly smoothly in the rendering process and I ended up back at square one with a blocky voxel size issue and slightly blown out shading. No idea what the issue is there, but hey, I have a functional example of a pyro sim as my work in progress for this week at the very least.
Don’t mind my very poorly edited backplate, it’s just a placeholder since I’ll have my own footage to add in soon enough!
So, that’s about the extent of my toils for the past week. I’m coming out of this experience so far having learned a lot about pyro sims and feeling a bit better about my grasp on them at least. Now all that’s left is figuring out what kind of parameters to adjust to get my flames to act like I want them to and refining the pyro shader. Things should mostly be uphill from here I’m hoping, that is unless I come out of this week’s critiques being told that I have to downsize my simulation again and go back to square one… Find out on my blog next week!