Dr. Strange VFX Recreation: Regaining Momentum
Remember what I said about taking a breather and having a nice spring break? Unfortunately that didn’t quite work out for me, as I ended up falling ill and dealing with that for most of my break. I am doing better now luckily, but the pressure is definitely on as we get closer and closer to the end of the semester. This project has been giving me some trouble lately as well, but I’m doing my best to keep trudging onwards!
Since my last blog post, I’ve kept up with some overall refinement tasks to improve the quality of my scene, including adjusting the look/shape of the cobblestones, adjusting lighting, and fine-tuning all the textures in my scene. The lighting is still something that has been bothering me, since I still can’t quite shake the feeling that something is off with it. Specifically, the shadows and highlights on the cobblestones still don’t feel quite right, so that’s something I’ll be playing with more as I move towards creating my final comp.
When it comes to the magic, for both the stream and sparks I’ve mostly been working on fine-tuning them both to better match my reference shot, since the base effects are pretty solid so far. I ended up splitting the magic stream into 2 different find shortest paths nodes to have more control over the shape of the stream, along with giving me the ability to offset the timing of the two sections of the magic stream (since the streams in the ref shot don’t all advance at the same rate).
Using the new and improved magic stream iteration, I have also been fine tuning the particle sim of the magic sparks. The main issue I’ve had so far is that the energy of the magic sparks has just felt very wrong so far, it’s way too wild and uncontrolled. Especially for the particles that emit a short distance above the magic stream, I needed them to feel quick and powerful but still controlled and light. So, I turned down the wind and velocity acting on the particles by a decent amount and also adjusted the life expectancy to ensure they don’t stick around for too long. In addition, I added a lot more particles and messed with the ramp controlling the variation of the particles’ pscale to try to achieve the right spectrum of particle sizes and make them more visible in the scene overall.
I was pretty satisfied by the results of my adjustments after going through many alternate iterations, though the pscale variation is the main thing I’m still a bit concerned about still needing to fix. All in all though I think the magic is definitely getting closer to being comp-ready, so hopefully by next week I can try out adding some comp effects on them.
Once I finished adjusting all my existing elements, it was finally time to tackle something new and work on creating the final elements for my shot. The first new thing I decided to start working on was the vellum grains simulation for the falling dirt underneath the cobblestones, and boy have they been giving me a run for my money so far. I couldn’t even tell you how many tutorials I’ve watched and how many iterations of this sim I’ve created so far, but I’m pleased to say all my learning and experimentation did produce a functional result in the end!
To be honest, vellum grains themselves weren’t super hard for me to pick up concept-wise. The vellum nodes seem fairly straightforward, and though this was my first time directly working in a dops network, it seems that my time in popnets with particle sims prepared me well for exploring the rest of what dops has to offer. However, my main roadblocks in creating the vellum grains for my scene specifically had to do with the specific behavior I needed the grains to have-- the dirt needs to crumble not all at once and fall apart sort of in chunks, and also needs to leave some dirt behind on the perimeter of the pit. After many attempts of various methods of controlling the grains’ behavior and many simulations of just a large sheet of vellum grains falling uniformly, I finally found a working method to break up and clump the grains while also being able to control when the grains are “activated” and start falling with a mask of sorts.
Although my end result combined many different tricks and methods I learned across various tutorials and documentation, there was one tutorial in particular that finally gave me that “aha” moment and was my light at the end of a very dark tunnel. This tutorial by FUZE VISUAL was incredibly helpful in solving my issue of needing the grains to break apart in chunks, the only slight issue being that the video happened to be spoken in Arabic. Luckily for me, the Houdini interface was still in English, but I did have to do a bit more work and research to figure out the “why” of certain things he did in the tutorial and figure out what each node was doing specifically.
The setup for this first pass of the falling dirt ended up starting with a rectangle that I transformed to cover the area below the moving cobblestones. I then wired that geometry into a vellum grain constraints node to get the basic matrix of grains, turning on jitter to add some variation in the alignment of the grains. From there, I essentially used a cluster points node with noise added from a point vop to voronoi fracture the block of grains into chunks.
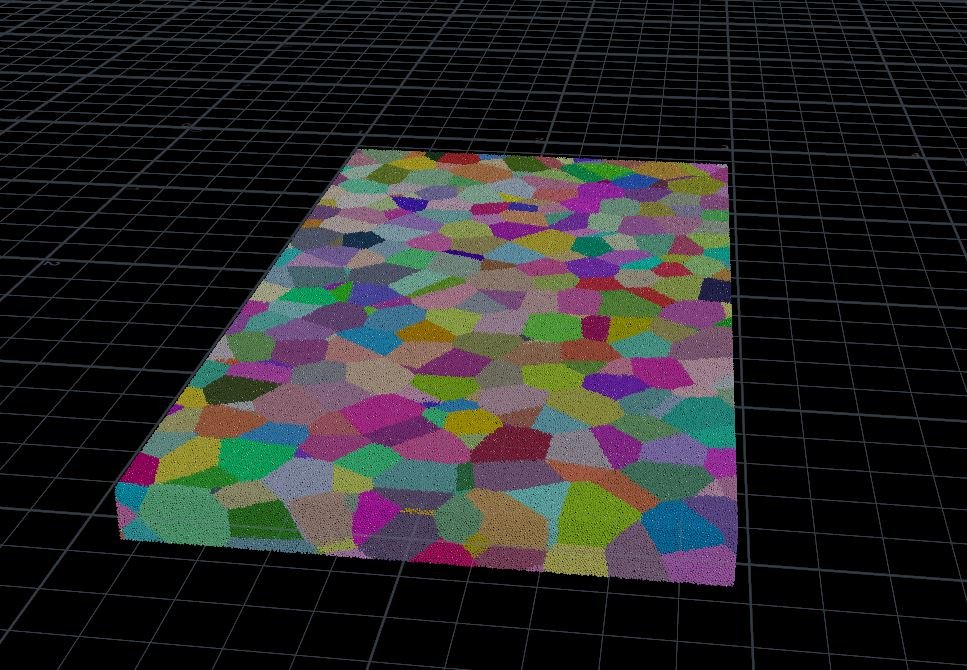
After determining the chunks, I used a split node to separate out a small portion of them to be the larger chunks of grains that would stick together, while the rest of the grains would act more independently. I fused the points of the grain chunks according to the clusters originally created by the cluster points node, then wired both groups of grains into a regular vellum constraints node with the independent grains as the regular input and the grain chunks as constraints input. With all the setup complete, it was finally time to dive into a dop network where I used a pretty basic vellum grain dynamics setup (using the vellum grain shelf tool as a base).
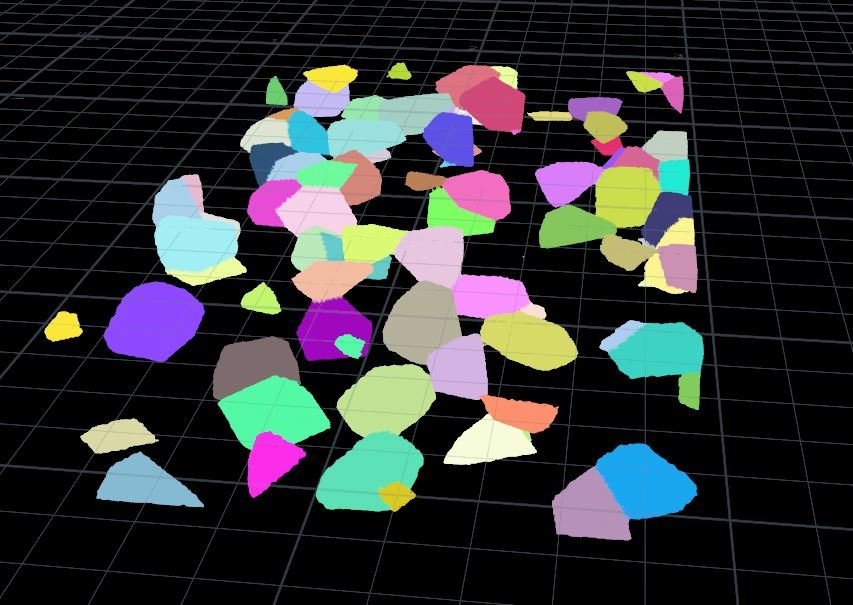
The only extra thing I added to the dopnet was a sop solver that would ensure the grains didn’t begin to fall and crumble all at once, but rather in a masked out area once they’re determined to be “active”. To achieve this behavior, I essentially used a very similar setup to the one that activates the cobblestones to begin moving once the magic stream touches them, using an attribute transfer from an animated geometry act as a mask on the grains. The only difference with this setup was that I just keyframe transformed a box geometry to determine the mask area instead of utilizing the magic stream. Specifically, I had to convert a box to a vdb and then fill it with points to get the mask area to be the full rectangle I needed it to be, rather than just the corner points or an outline of the perimeter of the rectangle.
After a fair amount of testing and adjusting values within the dop net to refine the behavior and dynamics of the grains, I finally achieved a working version of the falling dirt sim! I decided to utilize triplanar texturing for the grains as well, which didn’t look half bad, though I honestly don’t know if that’s the proper way to add texturing to vellum grains or not.
After gaining a little confidence boost from successfully producing a solid first pass of the vellum grains, it was finally time for me to confront what I had been dreading: fixing the rotation of the cobblestones. In previous weeks, I had figured out a way to get the cobblestones to rotate 360 degrees as they traveled along the movement curves utilizing an orient along path node. However, as I’ve been trying to refine all my existing elements, the one issue that had been sticking in my mind was that the rotation wasn’t quite right timing-wise. In the reference shot, the cobblestones begin rotating and reach a 90 degree rotation before they even begin moving horizontally, something that I was not able to achieve utilizing the orient along curve node. So, it was back to the drawing board to figure out an alternative method of rotation that wouldn’t be dependent on the horizontal movement of the cobblestones.
One thing I theorized about relatively early on in the process regarding the rotation was that in theory, I should be able to apply the same incrementing attribute solver I used for the cobblestones’ movement on their rotation as well--just plugging that attribute into an attribute adjust vector node adjusting the point’s normals instead of the carve node. However, a quick test of creating another set of attributes for the rotation proved unsuccessful, with the cobblestones not rotating at all.
I tried a couple of alternative methods after this, but at the same time, I couldn’t shake the feeling that I had the right idea in the first place but the wrong execution. So, I turned back to my incredibly helpful friend and classmate, Mubashir, to help me brainstorm and problem solve why exactly the solver was working for the movement and not the rotation. This launched us into a long session of testing and experimentation, where it seemed that a major issue I had was the organization of my nodes and trying to do too many things in one place. With that in mind, I got to work cleaning up and getting rid of unnecessary nodes and most importantly, I separated out the movement and rotation for the cobblestones’ points into 2 different solvers.
After lots of reorganization and testing with the separated solvers, finally both the rotation and the movement started working properly. For the final setup, the attribute driving the rotation actually ended up being utilized in an attribute wrangle node with a bit of code utilizing the quaternion function, which just worked better for utilizing both the N and up attributes to have the cobblestones rotate on the proper axis [DOUBLE CHECK]. Mubashir even helped me properly implement a ramp to the speed of both the rotation and movement as well, since that had been something I was working on implementing previously, but I was lacking just a little bit of vex knowledge to ensure the ramp was properly communicating with the attribute it was affecting.
All those trials and tribulations finally ended up with this work in progress shot for this week:
The past weeks were full of a rollercoaster of emotions regarding this project to say the least, but I am feeling a little bit better about my progress this week after finally tackling 2 of the biggest looming tasks on my plate. The end of the semester is definitely still a little too close for comfort, but hopefully if my progress can continue on this productive trajectory, I won’t be in too bad of shape for starting to refine and finalize my project in the next month.